
How to Download Images from Google Slides: 6 Methods

Documami expert
Last verified: May 2026 | Applies to: Google Slides on desktop (Chrome, Firefox, Safari) and mobile (iOS & Android)
Table of Contents
Google Slides hides a frustrating limitation behind an otherwise polished interface: you cannot right-click an image and save it. Images are embedded into the slide canvas as objects, not stored as standalone files you can grab directly. So whether you’re trying to reuse a graphic from a colleague’s deck, extract your own illustrations for another project, or pull every image from a 50-slide presentation at once, you need a workaround.
We tested all six methods below on a live Google Slides presentation and documented exactly what you get, including quality differences, hidden limitations, and the privacy risks nobody else seems to talk about. Pick the one that fits your situation using the comparison table, then jump straight to the steps.
Quick comparison: 6 methods at a glance
| Method | Works in | Quality | Bulk support | Privacy | Extra software needed |
|---|---|---|---|---|---|
| 1. Save to Google Keep | Browser (editor) | Good (slight compression) | No. One at a time | ✅ Private | None |
| 2. Download slide as PNG/SVG | Browser (editor) | Excellent | No. One slide at a time | ✅ Private | None |
| 3. Publish to web | Browser (editor) | Original | No. One image at a time | ⚠️ Temporarily public | None |
| 4a. Export to PowerPoint | File | Original | Yes. Via right-click | ✅ Private | Microsoft PowerPoint |
| 4b. Rename .pptx to .zip | File | Original | Yes. All images at once | ✅ Private | None (just a file manager) |
| 5. Chrome extension | Browser (editor) | Original | Yes | ⚠️ Requires Google account access | Chrome extension install |
| 6. Documami file extractor | File (upload) | Original | Yes. All images at once | ✅ Fully private, no account needed | None |
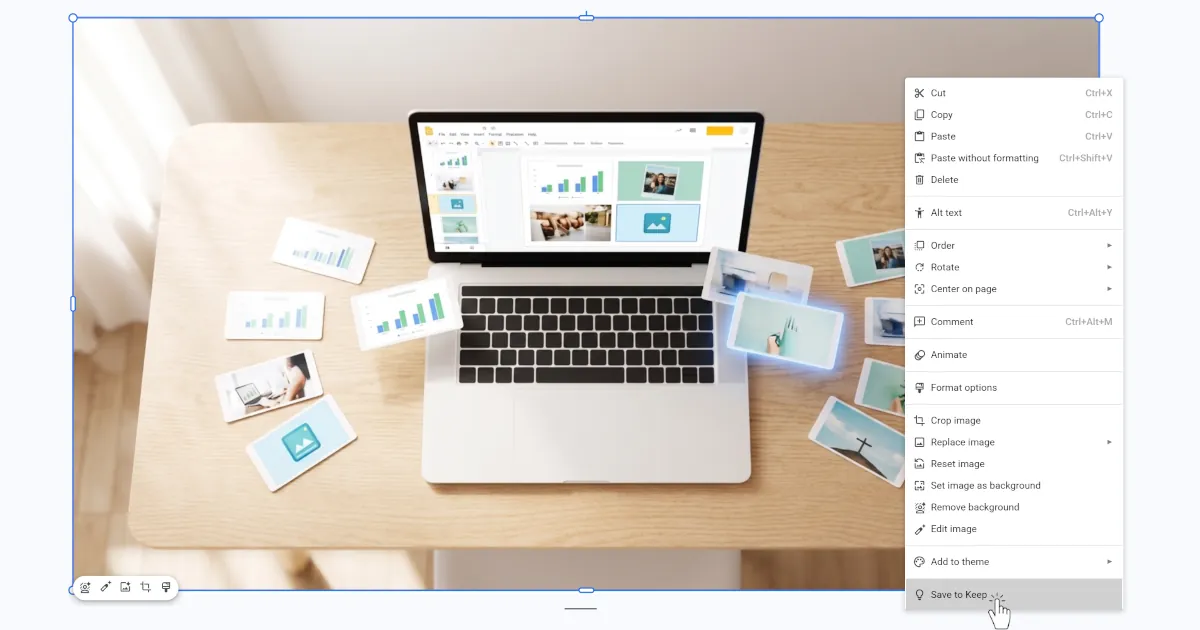
Method 1: Save to Google Keep (fastest for single images)
Best for: Quickly grabbing one or two images without leaving your browser. Limitation: Google Keep applies slight compression. You won’t get the original file at full fidelity. Not suitable for high-resolution work.
Steps:
- Open your Google Slides presentation in the browser.
- Click the image you want to save to select it.
- Right-click the image and choose Save to Keep from the context menu. A Keep sidebar opens on the right with the image already added to a new note.
- In the sidebar, right-click the image thumbnail and select Save image as…
- Choose your save location and click Save.
Note: If “Save to Keep” doesn’t appear in your right-click menu, the image may be part of a grouped object or set as a slide background. Try ungrouping first (right-click → Ungroup), or use Method 2 instead.
Quality note: Google Keep compresses images modestly during sync. For casual reuse this is fine. For print or high-resolution work, use Method 2 or 4b instead.
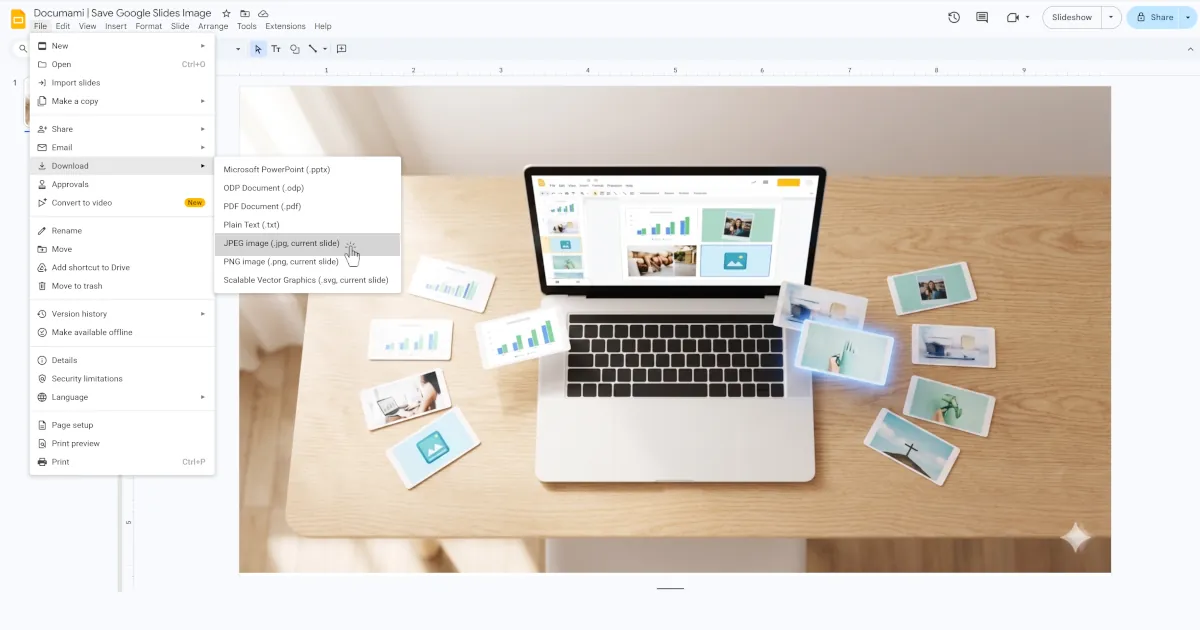
Method 2: Download the slide as PNG, JPEG, or SVG (best single-image quality)
Best for: Extracting one image at full resolution, or saving a slide that’s essentially one large graphic. Limitation: Downloads the entire slide, not just the image. You’ll need to crop away any surrounding text or other elements.
Steps:
- Go to the slide containing the image.
- If possible, temporarily move or delete any overlapping text boxes to isolate the image. (You can undo this with Ctrl+Z / Cmd+Z immediately after downloading.)
- Click File → Download, then choose:
- PNG image (.png, current slide) – best for graphics, logos, screenshots, or anything with transparency.
- JPEG image (.jpg, current slide) – smaller file size, fine for photos where transparency isn’t needed.
- SVG (.svg, current slide) – see the pro tip below.
- The file downloads to your default downloads folder. Open it and crop to isolate just the image using Preview (Mac), Photos (Windows), or any image editor.
Pro tip – higher resolution exports: Google Slides exports PNG at a fixed pixel dimension based on your slide size. If you need more pixels (for print or large displays), go to File → Page setup → Custom, double both dimensions (e.g. 1920×1080 → 3840×2160), export as PNG, then reset the slide size. The export will contain significantly more pixels.
Pro tip – SVG for designers: If the image you’re trying to extract is a logo, icon, or vector illustration, download the slide as SVG instead of PNG or JPEG. SVG is resolution-independent, it scales to any size without pixelation. This option is buried under File → Download → Scalable Vector Graphics (.svg) and almost never mentioned in other guides. Open the downloaded .svg in Adobe Illustrator, Figma, Inkscape, or any vector editor to extract or edit the graphic inside.
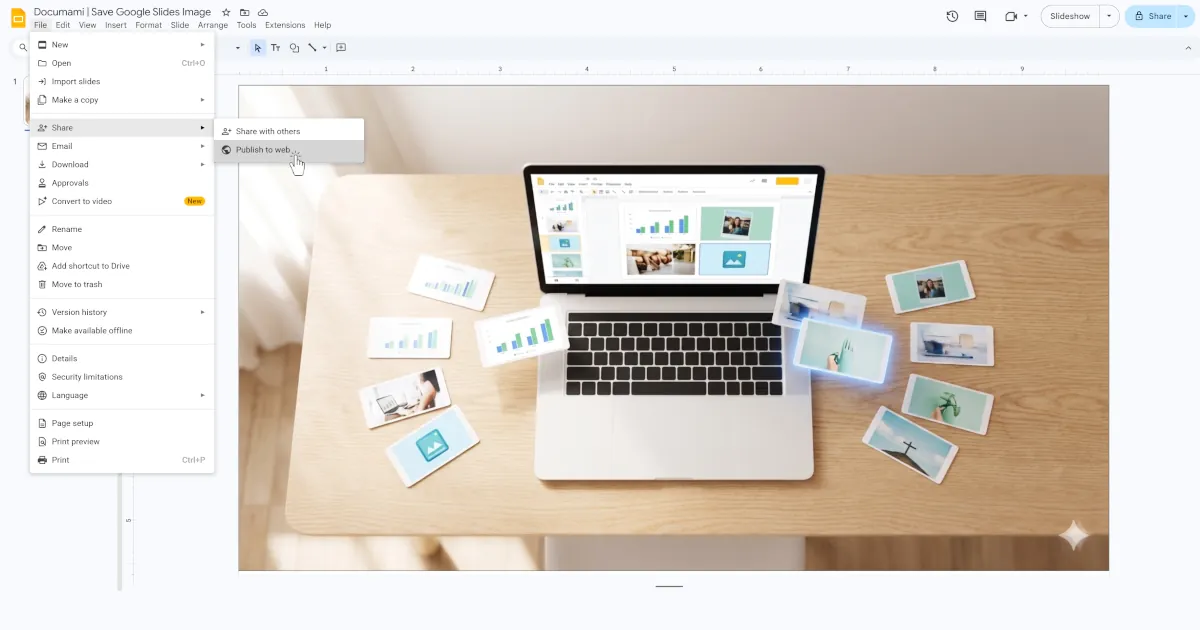
Method 3: Publish to web and right-click save (best image quality, no cropping)
Best for: Getting the image at its original quality and dimensions without having to crop a full slide export. Limitation: Temporarily makes your presentation publicly accessible on the internet. You must revoke access after you’ve saved your image – steps included below.
This method works because “Publish to web” renders your slides as actual web pages, where images sit in the DOM as real <img> elements, the same way any image on a website works. That means you can right-click and save them directly.
Steps:
- With your presentation open, click File → Share → Publish to web.
- In the dialog that appears, click Publish, then confirm.
- Copy the link that appears and open it in a new browser tab.
- Navigate to the slide containing your image.
- Right-click directly on the image and select Save image as… Save the file to your device.
- Immediately revoke public access (see steps below).
How to stop publishing (important):
- Go back to your presentation and click File → Share → Publish to web again.
- At the bottom of the dialog, click Stop publishing.
- Confirm when prompted. The public link will immediately stop working.
Why this matters: Any link shared from a published presentation, in Slack, email, or elsewhere, will continue to work until you stop publishing. Don’t skip this step for decks that contain confidential information.
Method 4a: Export to PowerPoint and right-click save (best for multiple images, needs Office)
Best for: Extracting several specific images individually, in their original quality and format. Limitation: Requires Microsoft PowerPoint to be installed on your device.
Steps:
- Click File → Download → Microsoft PowerPoint (.pptx).
- Open the downloaded .pptx file in Microsoft PowerPoint.
- Navigate to the slide containing the image.
- Right-click the image and select Save as Picture…
- Choose your format (PNG recommended for quality) and save location.
- Repeat for any other images you need.
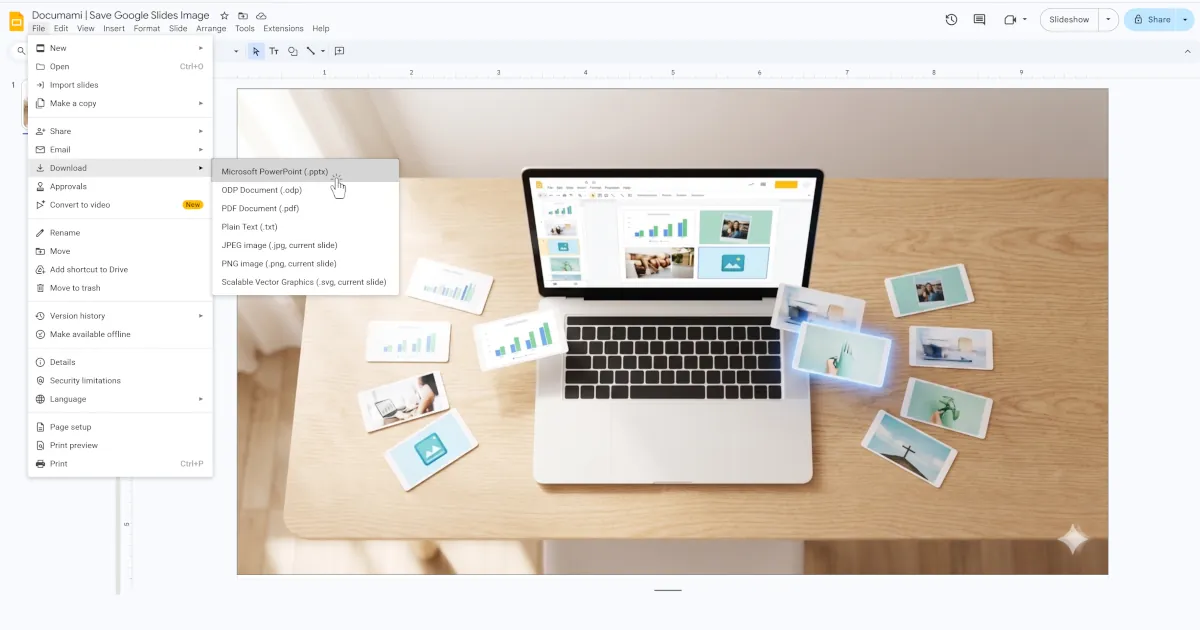
Method 4b: Rename .pptx to .zip (bulk extract, no software needed)
Best for: Extracting every image from a presentation at once, without PowerPoint, without any tool installation. Limitation: Slightly technical, requires renaming a file extension and navigating a folder structure. Takes about 2 minutes once you know the steps.
This works because .pptx files are actually ZIP archives in disguise. Inside the ZIP is a folder called ppt/media/ that contains every image in the presentation as a separate file, at its original quality and resolution.
Steps on Windows:
- Download the presentation: File → Download → Microsoft PowerPoint (.pptx).
- In File Explorer, navigate to your Downloads folder.
- If file extensions aren’t visible, click View → Show → File name extensions to enable them.
- Right-click the .pptx file and select Rename. Change
.pptxto.zipand press Enter. Confirm the rename when prompted. - Double-click the renamed .zip file to open it.
- Navigate into the ppt folder, then the media folder.
- All images (and any embedded audio/video) are here, named sequentially (image1.png, image2.jpeg, etc.). Select the ones you need and copy them to another folder.
Steps on Mac:
- Download the .pptx file as above.
- In Finder, right-click the file and choose Get Info. Under “Name & Extension”, change
.pptxto.zip. Close the window. - Double-click the .zip – macOS automatically extracts it to a new folder.
- Open the folder, navigate to ppt → media, and collect your images.
Note: Image filenames inside the ZIP are auto-generated (image1, image2…) and don’t correspond to slide numbers or original file names. If you need to match images to specific slides, Method 4a (PowerPoint) or Method 6 (Documami) will be easier.
The manual version of what Method 6 automates: The .zip trick works, but it takes 10+ steps and gives you a disorganised folder of numbered files. If you’re doing this regularly or need to extract from a large presentation, scroll down to Method 6.
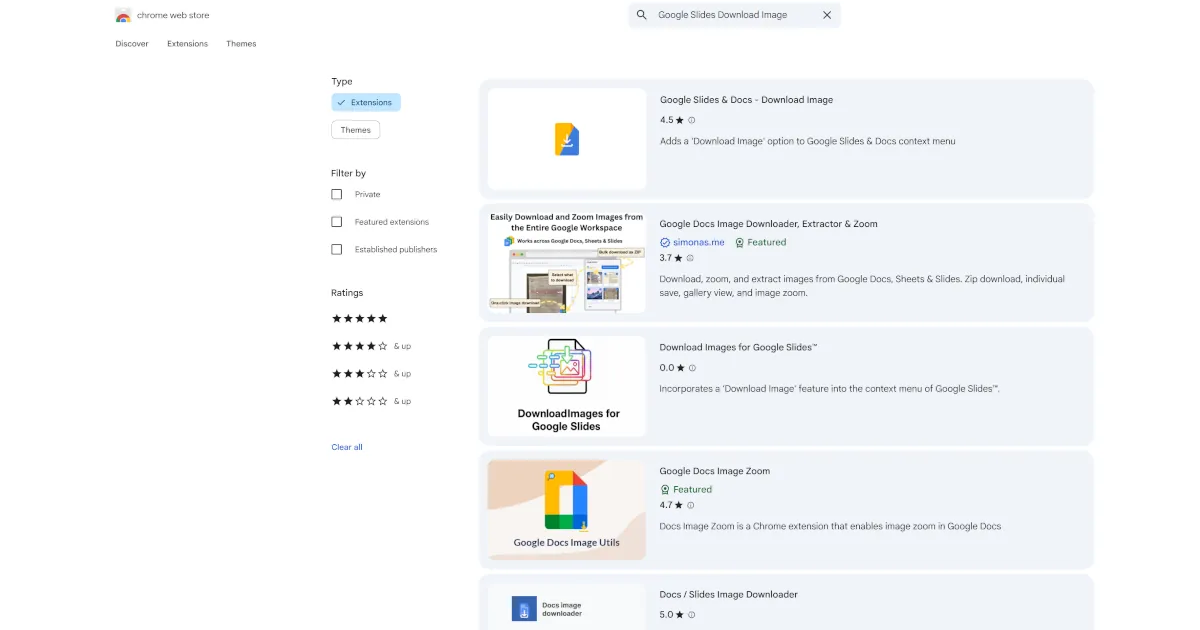
Method 5: Chrome extension (one click, but read the privacy note first)
Best for: Frequently downloading images from Slides as part of a regular workflow, and you’re comfortable granting extension permissions.
The “Google Slides & Docs – Download Image” extension in the Chrome Web Store adds a proper “Download image” option to the right-click menu in Google Slides, solving the problem natively.
Steps:
- Search “Google Slides download image” in the Chrome Web Store, or find the extension directly.
- Click Add to Chrome and confirm.
- Refresh any open Google Slides tabs.
- Right-click any image in a presentation and select Download Image. It downloads immediately to your Downloads folder in its original format.
⚠️ Privacy consideration – read before installing: Chrome extensions that interact with Google Slides must be granted access to your Google account in order to function. This typically means the extension can read and potentially interact with your Google Slides and Docs files, not just the presentation you’re currently viewing.
For most personal use, this is fine. But consider carefully if you’re using a work or shared Google account, if your presentations contain sensitive client data, proprietary designs, or confidential business information, or if your organisation has a policy restricting third-party app access to Google Workspace.
If any of those apply, Method 4b (the .zip rename) or Method 6 below are safer choices, neither requires any Google account access at all.
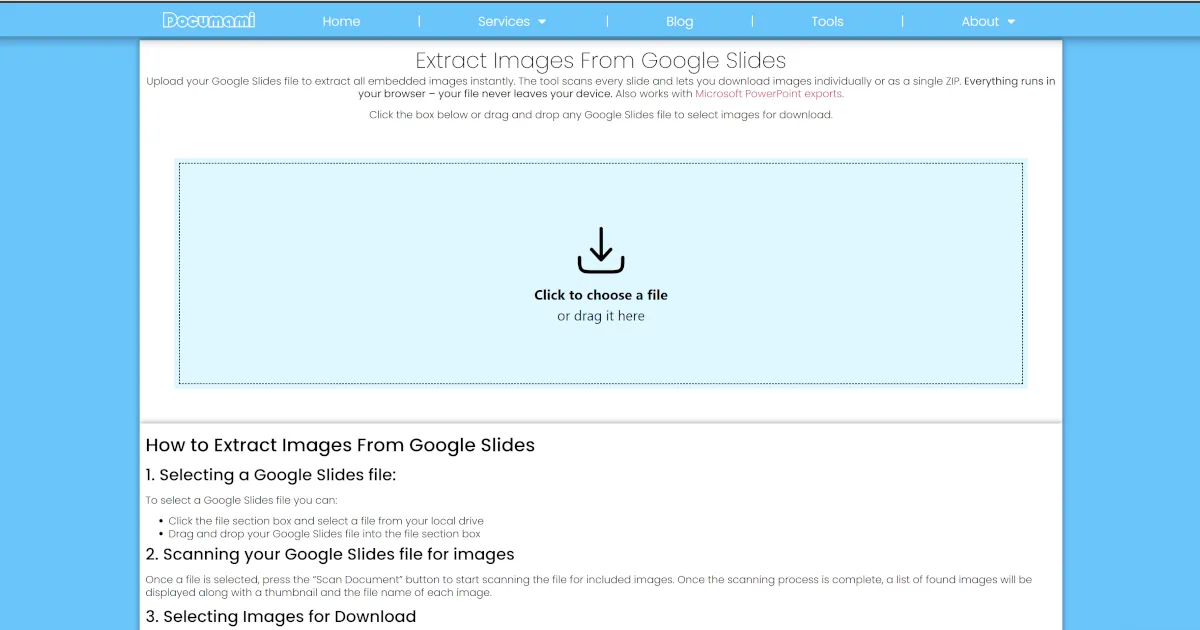
Method 6: Extract every image at once – no extensions, no Google account needed
Best for: Bulk extracting all images from a presentation file with one click; users on shared/work accounts who can’t install extensions; anyone handling a confidential deck.
This method uses Documami’s free Google Slides image extractor. Unlike the Chrome extension, it operates entirely within your browser using client-side processing. Your presentation file is never uploaded to a server, and no Google account access is required at any point.
Steps:
- In Google Slides, click File → Download → Microsoft PowerPoint (.pptx) to save the presentation to your device.
- Go to documami.com/tool/export-image-from-google-slides-online-free/
- Click Upload file and select the .pptx file you just downloaded.
- The tool extracts and displays all images from the presentation. Select the ones you want (or use Select All).
- Click Download. If you’ve selected more than one image, they’ll be packaged into a .zip file automatically.
Why this is different from every other method:
- No Chrome extension to install or permissions to grant
- No Google account sign-in required
- Your file never leaves your browser. Processing is 100% client-side
- Works on any browser and operating system (Windows, Mac, Linux, iOS, Android)
- Extracts every image from the entire presentation in a single step, not slide by slide
- Images download in their original format and quality (PNG, JPEG, GIF, whatever was in the original file)
This is particularly useful for teams handling client presentations, legal or financial documents in slide format, or any situation where granting a third-party extension access to your Google account isn’t appropriate.
What if downloads are disabled?
Some Google Slides presentations are shared with “Viewer” access and have the download option turned off by the owner. When this is the case, the File → Download menu either won’t appear or will be greyed out, and Methods 2, 4a, 4b, and 6 won’t work (they all require downloading the file first).
Options when downloads are disabled:
- Method 1 (Save to Keep) may still work if you have Commenter or Viewer access, since it doesn’t trigger a file download. It copies the image through the Google Workspace ecosystem. Try this first.
- Method 3 (Publish to web) only works if the presenter has enabled publishing. You’ll need access to that setting yourself, which Viewers don’t have.
- Screenshot remains available regardless of download restrictions. Use your OS snipping tool (Snipping Tool on Windows, Shift+Cmd+4 on Mac, Shift+Ctrl+Show Windows on Chromebook) and crop to the image. Quality will be limited to your screen resolution.
- Request access from the owner. If you genuinely need the original image, the cleanest option is to ask the presentation owner to either share the source file or re-enable downloads for you.
There is no way to bypass a download restriction without the presentation owner’s involvement, and attempting to do so likely violates your organisation’s data policies.
How to save images from Google Slides on iPhone and Android
On iPhone (iOS):
- Open the Google Slides app and navigate to the slide with your image.
- Tap the image to select it, then tap the three-dot menu (⋯).
- Select Save to Keep if available, then open Google Keep, long-press the image, and tap Share → Save to Photos.
- Alternatively, take a screenshot (press Side button + Volume Up simultaneously on Face ID iPhones, or Side button + Home button on older models), then crop in the Photos app.
On Android:
- Open the Google Slides app and navigate to the relevant slide.
- Tap and hold the image, then select Save to Keep from the menu that appears.
- Open Google Keep, long-press the saved image, and tap Save to device.
- Screenshot fallback: press Power + Volume Down simultaneously, then crop in your gallery app.
For bulk extraction on mobile: Download the .pptx file from the Google Slides app (tap the three-dot menu at the top → Share & export → Save as PowerPoint), transfer it to a desktop, and use Method 4b or Method 6.
Frequently Asked Questions
Why can't I right-click and save images in Google Slides?
Google Slides treats images as embedded canvas objects, not standalone files. They’re part of the slide’s rendering layer, similar to how images work inside a PDF. There’s no native “Save image as” option because, from the browser’s perspective, you’re not clicking on an image element you can directly download.
Does saving via Google Keep compress the image?
Yes, slightly. Google Keep syncs images across devices and applies modest compression during that process. For casual use (inserting into a doc, sharing on Slack), the quality is fine. For print, design work, or situations where you need the original file, use the PNG download (Method 2), the .zip rename trick (Method 4b), or Documami (Method 6), all of which give you the image at its original quality.
How do I extract all images from Google Slides at once?
Three methods support bulk extraction: the .pptx → .zip rename (Method 4b), the Chrome extension (Method 5), and Documami (Method 6). The .zip method requires manual file renaming and gives you unsorted numbered files. The Chrome extension is the most convenient if you’re on a personal Google account. Documami is the best option if you’re on a work account, handle confidential files, or want a clean organised download without granting extension permissions.
Can I save images if the presentation owner disabled downloads?
Partially. The “Save to Keep” right-click option (Method 1) may still be available since it doesn’t trigger a file download. Screenshots always work, but are limited to screen resolution. Methods that require downloading the .pptx file (2, 4a, 4b, 6) won’t be available to you. If you need the original image, ask the owner to share it directly.
What's the best method to preserve original image quality?
Methods 4b (.zip rename), 6 (Documami), and 3 (Publish to web) all give you images at their original quality, because they’re accessing the actual source files rather than re-exporting through Google’s rendering pipeline. Methods 1 and 2 involve re-rendering, which can introduce minor quality changes. Method 2 less so when exporting as PNG.
Is it safe to use a Chrome extension to download images from Google Slides?
It depends on your situation. The extensions themselves are generally legitimate. The most popular ones are reviewed by Google and used by many people. The consideration is the permission scope: they require access to your Google Slides files in order to work. For a personal account with non-sensitive presentations, this is a reasonable trade-off for the convenience. For work accounts, client data, or sensitive content, an extension-free method (4b or 6) is the safer choice.
What format are images saved in after extraction?
It depends on how the images were originally inserted into the presentation. Most images in Google Slides are stored as JPEG or PNG. When using the .zip method or Documami, you get the images in their original format. When using Google Keep or the PNG slide export, you get a PNG regardless of the original format.
All methods were tested on Google Slides in Chrome on macOS. Steps are accurate as of May 2026. Google occasionally updates the Slides interface. If a menu item has moved, the underlying functionality remains the same.


