
Generate Word Documents with JavaScript & docx-templates

Documami expert
This guide shows you how to generate Word documents with JavaScript using three key libraries: docx-templates, docx.js, and DocxTemplater.
Whether you need to generate Word documents in the browser or in a Node.js environment, these tools give you full programmatic control
over .docx file creation without any server-side dependencies.
We’ll use a practical example, an automated library overdue books notice letter, to demonstrate how to set up a template, pull dynamic
data with JavaScript, and generate a fully formatted Word document.
By the end, you’ll understand when to use each library and how to integrate document generation into your own projects.
Table of Contents
Advanced JavaScript Document Generation Features of docx-templates
Docx-Templates is a JavaScript template-based docx report creation library. This library excels at generating Word documents by combining template docx files with data. It supports both browser and Node.js offering both CDN and NPM install versions. This enables catering to a wide range of solutions and architectures. In this tutorial we will focus on utilizing some of the advanced features available:
- using queries inside templates for dynamic data extraction
- executing JavaScript snippets and injecting the results into the document
- dynamically embedding images and hyperlinks into the document
- using conditions and loops in the document template
- injecting literal XML into documents
It was created by Guillermo Grau Panea and actively maintained by over 20 contributors. The code is distributed under the MIT License. For additional information check out:
Document Generation Libraries Comparison
| Feature | docx-templates | docx.js | DocxTemplater |
|---|---|---|---|
| Approach | Template-based (use a real .docx as template) | Build documents programmatically from scratch | Template-based with placeholder syntax |
| Best for | Dynamic content in existing Word layouts | Full control over document structure | Enterprise-grade template automation |
| Environment | Browser + Node.js | Browser + Node.js | Node.js (browser with limitations) |
| License | MIT | MIT | Commercial (free tier available) |
| Learning curve | Low — uses familiar Word templates | Medium — requires understanding document structure | Medium — custom tag syntax |
| Dynamic images | ✓ | ✓ | ✓ (paid plans) |
| Loops & conditionals | ✓ | Manual | ✓ |
| npm package | docx-templates | docx | docxtemplater |
All three libraries support .docx generation — the right choice depends on whether you're starting from an existing Word template or building a document from scratch programmatically.
Getting Started
In our previous blog post, we set up a basic example scenario for creating a notice letter document from a template. We used an HTML form to collect the required information and injected it into the template to generate the final document. In today’s post, we’ll take it even further and create our notice letter from a database-like object. We’ll also generate a dynamic list of overdue books, including their thumbnail image and a link to information about each book.
If you’d like to see the entire project visit our code sandbox for this tutorial.
Planning Our Project
As with our previous basic example of how to generate a document from a template, we will use an example scenario of creating a library notice letter for overdue books. In this advanced scenario, we will use an existing data object containing the library accounts and book data as a database. We’ll also define when books are overdue, what fines are charged for overdue books, and even offer a discount for returning them promptly.
Our objectives for this scenario will be:
- Define our library policy using a simple HTML module UI:
- When are books overdue? We’ll set the maximum number of days a book can be borrowed before it is overdue.
- What is the fine for each day books are overdue? We’ll set an amount for each day a book is overdue
- What fine discount will we offer for returning overdue books? We’ll set a discount percentage from 0% (no discount) to 100% (free of charge) if books are returned within a certain period.
- How long will the discount be valid? we’ll set the number of days for returning the books to receive the discount.
- Retrieve account and book information from our mockup database (we’ll use a data object from a JSON file as our database).
- Calculate and display which books are overdue, the fine charges amount, and the discount rate for each account.
- Create a notice letter document automatically for a selected account. The notice letter will include:
- The account owner’s name and account information
- The library policy for borrowing books
- The list of overdue books that includes:
- A thumbnail image of the book cover
- The book ID
- The title of the book as a hyperlink to more information about the book
- The checkout data of the book
- The number of days overdue
- The fine charges for the overdue days
- The sum of the total charges for all books
- Conditionally displaying discount information if a discount is offered.
- Save the generated documents directly to our local drive.
To meet our objectives we will need:
- An HTML page for setting the library policy and inspecting/selecting accounts
- A notice letter document template
- A JSON file containing our account and book information, as well as default library policy settings
- The cover image for each book
- JavaScript code to execute the scenario logic
Setting Up our Project Environment
Now that we have a clear understanding of what our example scenario should include, let’s proceed to build the basic project environment.
- Code editor – we’ll need a way to create our project’s javascript snippets in a js file, CSS, and HTML file. Any text editor will do, but using a code editor will make things a lot easier.
- Web Browser – since our HTML and javascript code will run locally, we’ll need a browser to access to user interface.
- Web server – to avoid issues with loading javascript files, we’ll need a web server to serve our files to the browser. Any lightweight web server will do, as we don’t need to do any processing on the server side, only serving the pages to avoid issues with security restrictions. There are many web servers to choose from, here are a few links to get you started:
- For Windows OS you can use Revex Tiny Web Server. It’s a small and simple web server that’s easy to configure and does not require installation.
- For Mac OS you can follow the guides in this post on the Apple website.
- For Linux OS you can find a few helpful webservers in this post from PC Suggest.
- For Visual Studio Code you can use the free Live Server Extension.
Once we have all 3 items, we can create the basic structure of our project. Select a folder on your local computer to store the project files. We’ll be creating the following project structure:
- index.html – user interface HTML module
- script.js – javascript code
- style.css – HTML styling definitions
- advanced-template.docx – notice letter docx document template
- db.json – JSON structured library account, book, and policy information
- books (folder) – a folder for storing the book covers
You can download the project files from our code sandbox for this example.
Creating the User Interface
Our index.html file that contains our user interface is fairly simple. It contains:
- Input elements for obtaining the input data for the library policy on overdue books and discounts
- A selector element for selecting the library account we’d like to inspect
- A div element for displaying the account information and notice letter generation button
- A script element for loading our javascript file
Here is the complete HTML file content:
					<!DOCTYPE html>
<html lang="en">
  <head>
    <meta charset="UTF-8" />
    <meta name="viewport" content="width=device-width, initial-scale=1.0" />
    <meta http-equiv="X-UA-Compatible" content="ie=edge" />
    <title>docx-templates browser advanced example - Documami</title>
    <link rel="stylesheet" href="style.css" />
  </head>
  <body>
    <div id="inputdiv" class="input-div">
      <h1>Library Books Late Notice Generator</h1>
      <h2>advanced docx-templates example</h2>
      <label for="overdueafter"
        >Books are overdue after
        <input
          type="number"
          id="overdueafter"
          name="overdueafter"
          min="1"
          style="width: 50px"
        />
        Days
      </label>
      <br />
      <label for="overduefine"
        >Overdue books are charged
        <input
          type="number"
          id="overduefine"
          name="overduefine"
          min="0"
          step="0.01"
          style="width: 50px"
        />
        $ per day
      </label>
      <br />
      <label for="discountpercent"
        >Offer a discount of
        <input
          type="number"
          id="discountpercent"
          name="discountpercent"
          min="0"
          max="100"
          step="1"
          style="width: 50px"
        />
        %
      </label>
      <br />
      <label for="discountperiod"
        >if books are returned within
        <input
          type="number"
          id="discountperiod"
          name="discountperiod"
          min="1"
          step="1"
          style="width: 50px"
        />
        days
      </label>
      <br />
      <br />
      <label for="accountselect"
        >Account
        <select id="accountselect" name="accountselect">
          <option value="none" selected disabled>Loading...</option>
        </select>
      </label>
      <div id="accountinfodiv" class="info-div"></div>
    </div> <script src="script.js" type="module"></script> </body>
</html>
Creating our Database Using A JSON File
To emulate a database for getting account and book information we will import a JSON file called db.json. The JSON data will be parsed and stored as a data object in our JavaScript file that can be accessed throughout the code. In our example we will use the following JSON data structure:
- accounts – an object containing account ID as key and the account information as value
- account Id String – an object containing the account information
- firstName – account owner’s first name
- lastName– account owner’s last name
- title – title prefix for addressing the account owner
- created – account creation date
- books – an array of books currently borrowed by the user
- id – book id
- checkoutDate – the date the book was checked out
- account Id String – an object containing the account information
- books– an object containing book ID as key and the book information as value
- book id String – an object containing the book information
- title – book title
- authors – an array of book author names
- publisher – book publisher name
- publishDate – published date
- thumbnail – a URL for the book’s cover thumbnail image
- infoLink – a URL for the book’s information page
- book id String – an object containing the book information
- settings – the library policy settings
- overduePeriod – the maximum number of days a book can be borrowed before it is overdue
- overdueFine – the fine for each overdue day
- discountPeriod – the number of days a discount is offered to return books at the discounted fine
- discountPercent – the discount amount in percent
You can find the complete db.json file with data in our code sandbox for this post.
Creating the docx Template
Our docx template file, advanced-template.docx, is at the core of our project. The template file will be used to generate all notice letter documents dynamically using the data from our DB data object.
In our last blog post covering the basics of document generation with JavaScript, we looked into using template variables that are replaced with data and using a ternary operator to implement an if-else inside the template to display data conditionally. In this advanced example, we introduce additional docx-templates syntax to create even more complex dynamic content.
Let’s look at our advanced-template.docx file:

As you can see, we’ve introduced some new commands:
QUERY – allows sending a query string to the JavaScript code. This can be used to dynamically build the data that is sent back to the template. In our case, we use the query statement to let our code know which account and book properties we’d like to have in our template data:
{{QUERY {“account”:[“title”,”firstName”,”lastName”],”book”:[“thumbnail”,”title”,”infoLink”,”authors”]} }}
The string will be sent as an argument to the function you supply when calling your createReport command to generate a document. The called function should return the data object that will be used by the templating engine. You can send any string with the QUERY command, and use any custom function to return data (including promise/async). This is a great feature that allows you to specify GraphQL/SQL queries in the template, that will dynamically query only the minimal data that is required for the template.
FOR and END-FOR – allows for looping through array elements in your data. In our example, we’re looping through each book element to add a row of book information to the overdue books table. It supports the following format:
{{FOR book IN books}}
access any book property by using $book.propery
{{END-FOR book}}
This feature is great for creating dynamic tables and lists.
JavaScript Snippets Injection – allows for executing JavaScript code inside the template and displaying the outcome. In our example template, we’re using JS code snippets to:
- calculate the number of overdue books by using books.length in some of the conditions. Since the books data property is an array in our data object, we can call the JavaScript length property to get the number of books in the array.
- calculate the fine charges amount after discount by using {{(totalCharges * (100-discountPercent)/100).toFixed(2)}} which is a js math operation done on our totalCharges and discountPercent data properties. This enables us to calculate the discount on the fly without the need to pre-calculate the discount in our code when preparing the data object.
This feature allows us to create new values or use js code to manipulate values by using data properties but at the same time preserve their original values so that they can be used again in other places in the template.
IF and END-IF – although covered in our previous post to display conditional text, in our advanced example we’re using multiple if/end-if commands to display different text when there is a discount /no discount/or no charges based on the discountPercent data property.
IMAGE – allows for inserting an image to the generated document based on an image object containing the image content as either an Array Buffer or Base64, as well as some additional options. We will look into the IMAGE command in greater detail later in this post.
LINK – allows for inserting hyperlinks into the created document based on a link object that contains the link URL and label (the text that appears in the link). We will look into using the LINK command later on in this post.
These commands demonstrate the power of docx-templates and JavaScript. They show how relatively simple templating syntax can generate advanced dynamic documents that would be very difficult to reproduce using a standard office template.
You can find the complete list of available commands on the docx-templates GitHub page.
Creating the Document Generation JavaScript Logic
Now that we have all of the building blocks for our project, it’s time to create the javascript code that will power our templating engine. Since this is an advanced example, we’ll skip the basic JavaScript code for interacting and creating event handlers for HTML elements. The script.js source file is heavily commented so you can track which functions take care of the UI interactions, loading the JSON file into a JS object, etc’
In this tutorial, we’ll focus on the JS code that is directly connected to the templating engine’s advanced features.
Displaying account and book information
Once you select the library account you’d like to inspect by selecting the account from the drop-down list in the HTML interface, the displayAccountInfo function is triggered.
The function will do the following:
- Collects the relevant account and book data from the jsonDB object.
- Calculate which books are overdue, what fine charges occur, and what discount is available.
- Display the account and book information by populating the accountinfodiv DIV element in the HTML.
If the account has overdue books the function will:
- add a “Generate Notice Letter” button to the bottom of the content.
- create an object (letterDataObj) that contains the account, book, charges, and discount data. This object will be used later to query the DB when it’s time to generate the notice letter. This object is not mandatory, it is passed to the notice letter generation function to avoid recalculating overdue books and charges, as we’ve already calculated that information for displaying it in the account status.
- create an event listener attached to the “click” event of the button that will call the document generation function (generateNoticeLetter) passing the letter data object and template location URL as arguments. The template URL is passed as an argument in case multiple templates will be needed based on the account status (such as an account balance document template). In our case, we only use one template, but feel free to experiment based on your usage scenario.
Here’s the complete function:
					function displayAccountInfo() {
  /** UI account information section DIV element*/
  const accountInfoDiv = document.getElementById("accountinfodiv");

  if (!accountInfoDiv) {
    console.error("displayAccountInfo: could not find account information div");
    return;
  }
  if (!overdueAfterInput || overdueAfterInput.value === "") {
    console.error("displayAccountInfo: could not find overdue period input");
    return;
  }

  if (!overdueFineInput || overdueFineInput.value === "") {
    console.error("displayAccountInfo: could not find overdue fine input");
    return;
  }

  if (!accountSelectInput || !accountSelectInput.value) {
    console.error(
      "displayAccountInfo: could not find the account selector input"
    );
    return;
  }

  if (!discountPercentInput || !discountPercentInput.value) {
    console.error(
      "displayAccountInfo: could not find the discount percent input"
    );
    return;
  }

  if (!discountPeriodInput || !discountPeriodInput.value) {
    console.error(
      "displayAccountInfo: could not find the discount period input"
    );
    return;
  }

  //store the input values as variables
  const accountId = accountSelectInput.value;
  const checkoutPeriod = Number(overdueAfterInput.value);
  const overdueFine = Number(overdueFineInput.value);
  const discountPercent = Number(discountPercentInput.value);
  const discountPeriod = Number(discountPeriodInput.value);

  //clear the account info div content
  accountInfoDiv.innerText = "";

  //get the account info from the db and create the account info HTML
  if (
    !jsonDb ||
    !jsonDb.hasOwnProperty("accounts") ||
    !jsonDb.accounts.hasOwnProperty(accountId)
  ) {
    console.error(
      `displayAccountInfo: failed to find account ${accountId} information in json database`
    );
    return;
  }
  const accountInfo = jsonDb.accounts[accountId];
  const accountInfoHTML = `
  <h3><u>Account status</u></h3>
  <b>Account ID:</b> ${accountId}<br/>
  <b>Account owner:</b> ${
    accountInfo.title !== "none" ? accountInfo.title : ""
  }  ${accountInfo.firstName} ${accountInfo.lastName}<br/>
  `;

  //get the book info from the db and create the book info table
  let bookInfoHTML = "";
  let overdueBooks = [];
  let overdueChargeSum = 0;
  if (accountInfo.hasOwnProperty("books") && accountInfo.books.length > 0) {
    bookInfoHTML =
      '<table class="books-table"><th>Book ID</th><th>Checkout date</th><th>Days since checkout</th><th>Overdue Fine</th>';
    for (const bookObj of accountInfo.books) {
      if (
        bookObj.hasOwnProperty("id") &&
        bookObj.hasOwnProperty("checkoutDate")
      ) {
        const bookId = bookObj.id;
        const bookCheckout = new Date(bookObj.checkoutDate).toLocaleDateString(
          "en-US",
          {
            dateStyle: "long",
          }
        );
        let Difference_In_Time =
          new Date().getTime() - new Date(bookObj.checkoutDate).getTime();
        const daysSinceCheckout = Math.round(
          Difference_In_Time / (1000 * 3600 * 24)
        );
        let fineAmount = 0;
        const overdueDays = daysSinceCheckout - checkoutPeriod;
        if (overdueDays > 0) {
          fineAmount = overdueDays * overdueFine;
          overdueChargeSum += fineAmount;
          overdueBooks.push({
            id: bookId,
            checkoutDate: bookCheckout,
            overduePeriod: overdueDays,
            fineAmount: fineAmount.toFixed(2),
          });
        }
        bookInfoHTML += `<tr${
          daysSinceCheckout > checkoutPeriod ? ' style="color:red;" ' : ""
        }><td>${bookId}</td><td>${bookCheckout}</td><td>${daysSinceCheckout}</td><td>$${fineAmount.toFixed(
          2
        )}</tr>`;
      } else {
        console.error(
          `displayAccountInfo: error getting book information for account id: ${accountId} book info: ${bookObj}`
        );
      }
    }
    bookInfoHTML += "</table>";
  } else {
    console.error(
      `displayAccountInfo: could not find book information for account id: ${accountId}`
    );
  }

  //combine the account and book info HTML
  let infoDivHtml = accountInfoHTML + "<br/>" + bookInfoHTML;

  //add fine charges info and generate notice letter button to the info HTML if applicable
  if (overdueBooks.length > 0) {
    infoDivHtml += `<br /><span style="color:red;">The account has ${
      overdueBooks.length
    } overdue books and will be charged $${overdueChargeSum.toFixed(2)}.<br />`;
    if (discountPercent > 0) {
      infoDivHtml += `The fine will be reduced to $${(
        (overdueChargeSum * (100 - discountPercent)) /
        100
      ).toFixed(2)} if books are returned within ${discountPeriod} days.<br />`;
    }
    infoDivHtml +=
      '<div class="actions-div"><button id="genletterbtn" class="input-btn">Generate Notice Letter</button>';
  }

  //populate the content of the account info div with the complete HTML
  accountInfoDiv.innerHTML = infoDivHtml;

  //if fine charges apply, create an object with the required info
  //and add event listener to generate notice letter button,
  //passing the required info object to the callback function along with the template location
  if (overdueBooks.length > 0) {
    const letterDataObj = {
      accountId: accountId,
      totalCharges: overdueChargeSum.toFixed(2),
      overdueBooks: overdueBooks,
      finePerDay: overdueFine,
      checkoutPeriod: checkoutPeriod,
      discountPercent: discountPercent,
      discountPeriod: discountPeriod,
    };
    const genBtn = document.getElementById("genletterbtn");
    if (genBtn) {
      genBtn.addEventListener("click", (e) => {
        generateNoticeLetter(letterDataObj, TEMPLATE_URL);
      });
    }
  }
}
Dynamically Querying Document Data
Next, let’s take a look at the generateNoticeLetter that is responsible for generating the document, and is triggered when the “Generate Notice Letter” is clicked:
					async function generateNoticeLetter(letterDataObj, templateURL) {
  //load the template file
  const template = await getTemplateAsArrayBuffer(templateURL);
  if (!template) {
    console.error("generateNoticeLetter: Failed to get template");
    return;
  }

  //generate the document
  const report = await createReport({
    template,
    data: async (queryStr) => {
      return await queryExec(letterDataObj, queryStr);
    },
    cmdDelimiter: TEMPLATE_CMD_DELIMITER,
    literalXmlDelimiter: TEMPLATE_XML_DELIMITER,
    additionalJsContext: {
      bookImg: getBookImg,
      arrToLines: arrayToXMLLines,
    },
  });

  //set the output filename to the account id or default if missing
  if (
    letterDataObj.hasOwnProperty("accountId") &&
    letterDataObj.accountId !== ""
  ) {
    filename = letterDataObj.accountId + "_notice.docx";
  } else {
    console.error(
      "generateNoticeLetter: could not find the account ID for creating a file name. The file will be saved as:",
      filename
    );
  }

  //download the created document
  saveCreatedDocument(report, filename, FILE_MIME_TYPE);
}

async function getTemplateAsArrayBuffer(templateURL) {
  const template = await fetch(templateURL)
    .then((res) => res.arrayBuffer())
    .catch((err) => {
      console.error(
        "getTemplateAsArrayBuffer: Failed to fetch template file. Error:",
        err
      );
      return;
    });
  if (!template) {
    console.error("getTemplateAsArrayBuffer: No template file found");
    return;
  } else {
    return template;
  }
}
This function is the heart of the templating engine. It will try to load the template from the template URL that it receives as an argument. If the template is loaded successfully, it will call the docx-templates “createReport” function which generates the report by combining a data object (from our json data) and the template docx file.
Let’s look at our “createReport” command:
					const report = await createReport({
    template,
    data: async (queryStr) => {
      return await queryExec(letterDataObj, queryStr);
    },
    cmdDelimiter: TEMPLATE_CMD_DELIMITER,
    literalXmlDelimiter: TEMPLATE_XML_DELIMITER,
    additionalJsContext: {
      bookImg: getBookImg,
      arrToLines: arrayToXMLLines,
    },
  });
The function receives an options object with the following items:
- the template file as an array buffer
- a data key with the data object as a value – unlike our basic example where we set a static data object as the value, we’ll use a function to create the data object. Our function will receive the query string from the QUERY command in the template, and return an object containing the data after it’s done executing. Note that our function is asynchronous. The data key can accept both synchronous and asynchronous functions. When using an asynchronous function, the template engine will wait for the execution to complete before creating the document.
- a cmdDelimiter key – this key defines the string delimiters that will be used to recognize dynamic commands in the template. It can accept either a string or an array. If a string is used, the same string will be detected as the start and the end of the command (such as using ‘+++’ will recognize +++cmd+++ as the command). If an array is used, a different string can be defined for the start and end of the command (such as [‘{{‘,’}}’] will recognize {{cmd}} as the command, which is what we’re setting).
- a literalXmlDelimiter key – is a string to detect literal XML in the template. We’ll cover this in more detail later on in this post.
- a additionalJsContext key – accepts values, both functions and data, that can be accessed in the template. We are using this key to create two helper functions that can be called as part of the commands:
- bookImg – A function that will return the object required for embedding images by sending the image URL as an argument. We’ll cover this later on in the post.
- arrToLines – A function that receives an array of strings and separates them with a literal XML for placing each array item in a different row. We’ll cover this later on in the post as well.
Let’s focus on our data function. The function gets the query string argument from our first line in the template body:
{{QUERY {“account”:[“title”,”firstName”,”lastName”],”book”:[“thumbnail”,”title”,”infoLink”,”authors”]} }}
This means that it receives the following string: ‘{“account”:[“title”,”firstName”,”lastName”],”book”:[“thumbnail”,”title”,”infoLink”,”authors”]}’. In our example, this string defines the different properties of the account and book items that we want to include in the data object sent to the template.
For this example, an async function called queryExec was created. The function will take the query string along with the information object we created when showing the user information and uses both to query our jsonDb and return the requested data. Once queryExec is done executing, the returned data object will be sent to the templating engine to continue processing the template. You could use your own function to query any database or carry out any processing for creating a dataset object.
The dataset object returned by the queryExec function has the following structure:
- account – an object containing account information
- accountId – the account ID
- firstName – the account owner’s first name
- lastName – the account owner’s last name
- title – title prefix for addressing the account owner
- books – an array containing book information objects
- authors – a String array of author names
- bookId – the book ID
- checkoutDate – the date the book was checked out
- fineAmount – the fine amount due for the book
- infoLink – a URL to an information webpage about the book
- overduePeriod – how many days the book was overdue
- thumbnail – a URL to the book cover thumbnail image
- title – the book title
- checkoutPeriod – checkout days before the book is overdue
- discountPercent – the discount percent for returning the books within the discount period
- discountPeriod – the number of days a book can be returned with discounted or no fine charges
- docDate – the date of document creation
- finePerDay – the fine charge per overdue day
- totalCharges – the total charges for all books
While the content of the queryExec function is beyond the scope of this example, here are the relevant functions for completion:
					async function queryExec(letterDataObj, queryStr = "") {
  return new Promise((resolve, reject) => {
    const accountId = letterDataObj.accountId;
    console.log(
      "queryExec: recieved template query str:",
      queryStr,
      "and letterData Object:",
      letterDataObj,
      "for accountId:",
      accountId
    );

    //turn the template query string into an object, replacing different styles of single and multiple quotes into proper ones.
    //alternately you can use the fixSmartQuotes flag when calling docx-templates createReport to do this automatically
    let queryObj = {};
    if (queryStr !== "") {
      try {
        queryObj = JSON.parse(
          queryStr
            .replace(/[\u2018\u2019]/g, "'")
            .replace(/[\u201C\u201D]/g, '"')
        );
      } catch (error) {
        console.error("queryExec: failed to parse query string", queryStr);
        reject(
          `unable to parse query string: ${queryStr} with error: ${error}`
        );
      }
    }

    //query the DB
    let outObj = queryDB(letterDataObj, queryObj);
    if (!outObj) {
      console.error(
        "queryExec: failed to query db using object:",
        queryObj,
        "for account id:",
        accountId
      );
      reject(
        `failed to query db using object: ${queryObj} for account id: ${accountId}`
      );
    }

    //add additional charges and discount information from the UI inputs to the dataset object
    outObj["totalCharges"] = letterDataObj.totalCharges;
    outObj["finePerDay"] = letterDataObj.finePerDay;
    outObj["checkoutPeriod"] = letterDataObj.checkoutPeriod;
    outObj["discountPercent"] = letterDataObj.discountPercent;
    outObj["discountPeriod"] = letterDataObj.discountPeriod;
    let newDocDate = new Date().toLocaleDateString("en-US", {
      dateStyle: "long",
    });
    outObj["docDate"] = newDocDate;

    console.log(outObj);
    //return the dataset object
    resolve(outObj);
  });
}

function queryDB(letterDataObj, queryObj) {
  const accountId = letterDataObj.accountId;

  if (!jsonDb) {
    console.error("queryDB: missing json database");
    return;
  }

  //query jsonDb users with the account id
  if (!jsonDb.accounts || !jsonDb.accounts[accountId]) {
    console.error(
      `queryDB: account id: ${accountId} was not found in database`
    );
    return;
  }

  let queryRes = {};
  //filter account info
  if (queryObj.hasOwnProperty("account")) {
    queryRes["account"] = Object.fromEntries(
      Object.entries(jsonDb.accounts[accountId]).filter(([key, value]) =>
        queryObj.account.includes(key)
      )
    );
  } else {
    queryRes["account"] = jsonDb.accounts[accountId];
  }

  queryRes["account"]["accountId"] = accountId;

  //get all relevant books
  if (
    letterDataObj.hasOwnProperty("overdueBooks") &&
    letterDataObj.overdueBooks.length > 0
  ) {
    queryRes["books"] = [];
    for (const bookItem of letterDataObj.overdueBooks) {
      const bookId = bookItem.id;
      if (jsonDb.books.hasOwnProperty(bookId)) {
        //handle book info
        let bookData = {
          bookId: bookId,
          checkoutDate: bookItem.checkoutDate,
          fineAmount: bookItem.fineAmount,
          overduePeriod: bookItem.overduePeriod,
        };
        if (queryObj.hasOwnProperty("book")) {
          let bookInfo = Object.fromEntries(
            Object.entries(jsonDb.books[bookId]).filter(([key, value]) =>
              queryObj.book.includes(key)
            )
          );
          queryRes.books.push({ ...bookData, ...bookInfo });
        } else {
          queryRes.books.push({
            ...bookData,
            ...jsonDb.books[bookId],
          });
        }
      } else {
        console.error(
          "queryDB: could not find information for book id:",
          bookId,
          "account id:",
          accountId
        );
      }
    }
  }

  return queryRes;
}
Creating a Dynamic Table of Overdue Books
In our example, we’re creating a table of overdue books as part of the notice letter. While we statically generate columns in the template document, the table data is generated from an array of overdue books from our dataset, with table rows for each book containing its details:

As you can see above, we use the {{FOR}} and {{END_FOR}} commands to iterate through every book object in our dataset, and the template engine will add a new row for each iteration, that is, a book object. Here is the resulting table:
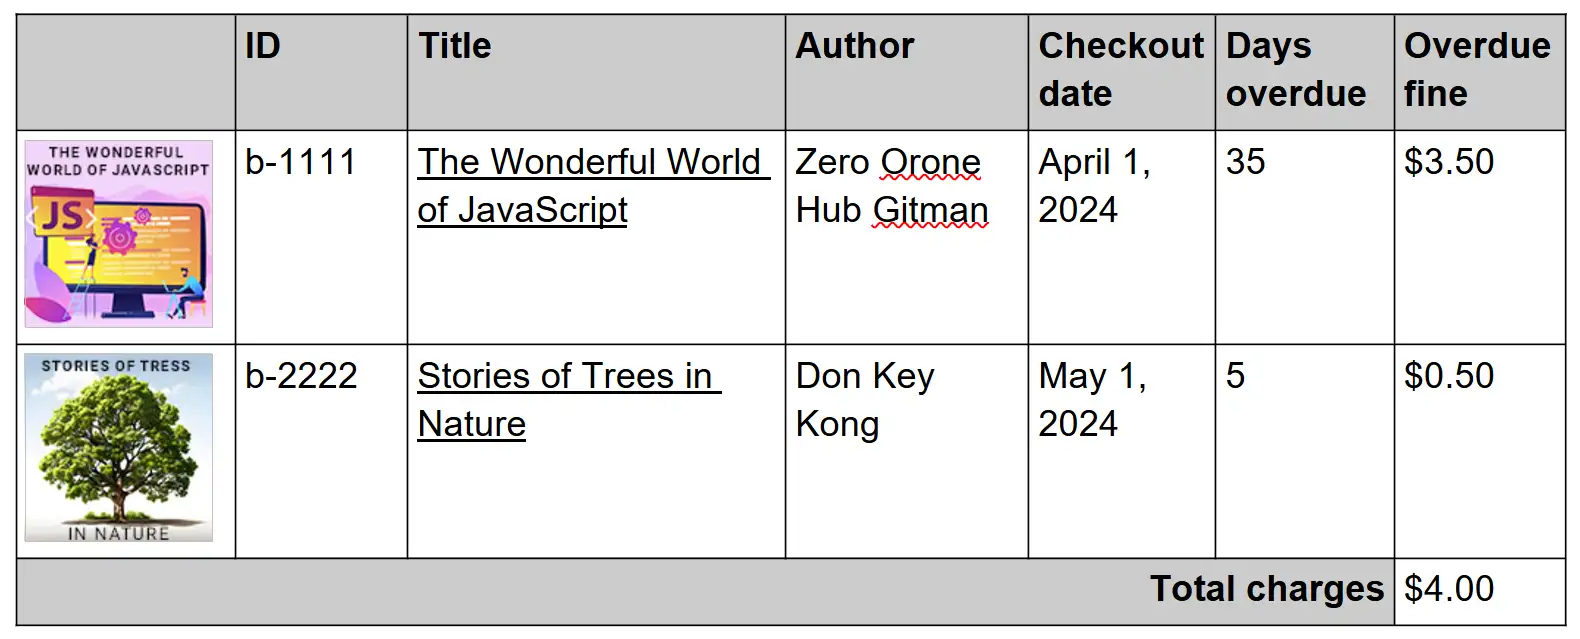
In the following subsections, we’ll take a look at how we create the image thumbnails, set a link from each book title to a book information page, and use literal XML to place each book author in a separate line.
Adding a Thumbnail Image for Each Book
Let’s look at how we embed images into our table rows for each book. Our dataset contains a “thumbnail” key for each book that contains the URL of the book cover image (in our example, book covers are stored under the “books” folder). To embed the image, we can use the IMAGE command which accepts an object that contains the following image information (taken from the project’s GitHub page):
- width: desired width of the image on the page in cm. Note that the aspect ratio should match that of the input image to avoid stretching.
- height: desired height of the image on the page in cm.
- data: either an ArrayBuffer or a base64 string with the image data.
- extension: one of ‘.png’, ‘.gif’, ‘.jpg’, ‘.jpeg’, ‘.svg’.
- thumbnail [optional]: when injecting an SVG image, a fallback non-SVG (png/jpg/gif, etc.) image can be provided. This thumbnail is used when SVG images are not supported (e.g. older versions of Word) or when the document is previewed by e.g. Windows Explorer.
- alt [optional]: optional alt text.
- rotation [optional]: optional rotation in degrees, with positive angles moving clockwise.
- caption [optional]: optional caption displayed below the image.
Since our thumbnail value is a URL, we will use a helper function that will retrieve the image from URL as an Array Buffer and return the appropriate image object to the command. We’ll place our function in the “additionalJsContext” section of our “createReport” command options argument so we can easily call it from the template. This is very useful as we don’t need to store the entire image buffer or base64 string in the dataset sent to the template engine. Instead, we can generate the required image object on the fly when needed by calling our function.
In the template, we use the following command:
{{IMAGE bookImg($book.thumbnail)}}
this command will send the content of the book thumbnail (our URL) to a function called “bookImg” defined in our “additionalJsContext”:
					const report = await createReport({
    template,
    data: async (queryStr) => {
      return await queryExec(letterDataObj, queryStr);
    },
    cmdDelimiter: TEMPLATE_CMD_DELIMITER,
    literalXmlDelimiter: TEMPLATE_XML_DELIMITER,
    additionalJsContext: {
      bookImg: getBookImg,
      arrToLines: arrayToXMLLines,
    },
  });
					async function getBookImg(imgUrl) {
  let buff = await getImgAsArrayBuffer(imgUrl);
  if (!buff) {
    console.error("getBookImg: failed to get image, using default image");
    return {
      width: 1,
      height: 1,
      data: "R0lGODlhAQABAIAAAMLCwgAAACH5BAAAAAAALAAAAAABAAEAAAICRAEAOw==",
      extension: ".gif",
    };
  } else {
    return { width: 2, height: 2, data: buff, extension: ".jpeg" };
  }
}
Every time the templating engine encounters our IMAGE command (for each book iteration in the table in our case), it will call the “bookImg” function and wait for the returned image object before proceeding. This command is very useful for adding dynamic images, QR codes, etc’ allowing for placing and replacing images based on different conditions directly from the template.
Adding a Hyperlink for Book Info
In addition to each book thumbnail image, we would also like to add a hyperlink pointing to the book information that will be opened in a browser when the book title is clicked in each one of the book table rows. Our dataset contains a key called “infoLink” that contains the info URL for each book (in our case pointing to a Google search of the book title). We’ll use the “LINK” command to place the hyperlink in the title column of the table in our document template:
{{LINK ({url: $book.infoLink, label: $book.title})}}
The “LINK” command accepts an object containing a “url” key for the URL string and an optional “label” key for the displayed link text. If the “label” key is not defined, the URL will be displayed as the text. In our scenario, we’ll use the “infoLink” property in each book object as the URL and the “title” property as the displayed link text. Once the document is generated, the title of each book will be clickable, leading to the URL we’ve set.
Injecting Literal XML for custom formatting
In our example scenario, some books may have more than one author. Since we do not know how many authors each book has we can’t pre-format different lines for each author in the template. We can, of course, use the “FOR” and “END-FOR” commands to loop through the authors as we’ve done with each book, but a much simpler solution would be to inject a new line between each author to get the same result. This is where literal XML injection came in handy.
A docx file is essentially a zip file that contains all the required files that define a document and its content. The main document file, among others, uses XML markup to define the content and formatting. There are different XML tags and structures for different formatted text, paragraphs, lists, etc’ (for example text with bold font weight will have specific XML tags defining where to start and end the bold font settings).
When docx-templates dynamically sets text inside a document, the text is wrapped in a <w:t> tag: <w:t xml:space=”preserve“>dynamic text</w:t>
In our example, we’ll use a common XML syntax for placing a new line: <w:br w:type=”textWrapping”/>
Essentially, we want to create an XML snippet that looks like this:
					<w:t xml:space="preserve">
    author 1
</w:t>
<w:br w:type="textWrapping"/>
<w:t xml:space="preserve">
    author 2
</w:t>
Instead of doing this manually, we’ll create another function called “arrToLines” in our “createReport” command options under “additionalJsContext”. The function will receive the array we wish to split from the template and will use JavaScript’s Array.join() to add: </w:t><w:br w:type=”textWrapping”/><w:t xml:space=”preserve”> between each author in the authors array. This way we can easily call the function from the template whenever we want to split array values into separate lines.
We need to wrap our literal XML with the delimiters we’ve set for literal XML so that the template engine known the string should be placed as XML inside the document and not as text. The final separator string is: ‘||</w:t><w:br w:type=”textWrapping”/><w:t xml:space=”preserve”>||’ – where the pre and post ‘||’ are the literal XML delimiter we’ve set in the command options using the “literalXmlDelimiter” key.
Here is the syntax from the authors column in our template:
{{ arrToLines($book.authors)}}
Here is the output in the generated document:

and here is the function that we’re adding in our JavaScript code that will turn the array received as a document into:
					function arrayToXMLLines(arr) {
  const outStr = arr.join(
    `${TEMPLATE_XML_DELIMITER}</w:t><w:br w:type="textWrapping"/><w:t xml:space="preserve">${TEMPLATE_XML_DELIMITER}`
  );
  return outStr;
}
You can learn more about the different files that a docx document contains and the XML structure by changing a document’s extension from .docx to .zip and unzipping its content. Please browse through the different files to learn more about them. The main document content file is usually located under word/document.xml.
Adding a Conditional Discount Paragraph
Once we have our table of overdue books in place, it’s time to handle the discount section. In our example, a discount for late fees can be defined if a book is returned within a certain number of days to motivate the account owner to return the overdue books quickly. In our template, we want to add the appropriate information according to the following logic:
- if the discount amount is 0% there is not discount offered and discount information should be omitted from the generated notice letter.
- if the discount amount is 100% the account owner should be notified that no late fees will be charged if the book is returned within the defined period.
- if the discount amount is between 1% and 99% the discount information should be included in the notice letter.
To accomplish this we will use the “IF” and “END-IF” operator to implement an if-else structure:
					{{IF discountPercent>0 && discountPercent<100}}

As a valued customer, we’d like to offer you a {{discountPercent}}% discount if the {{= books.length > 1 ? `books are` : `book is` }} returned within {{= discountPeriod > 1 ? `${discountPeriod} days` : `one day`}}, and you will only be charged ${{(totalCharges * (100-discountPercent)/100).toFixed(2)}}.
{{END-IF}}
{{IF discountPercent==100}}

As a valued customer, we’re willing to cancel the fine charges if the {{= books.length > 1 ? `books are` : `book is` }} returned within {{= discountPeriod > 1 ? `${discountPeriod} days` : `one day`}}.
{{END-IF}}
The paragraphs in the template will only be included in the generated document only if the value of the “discountPercent” key in our dataset matches the condition. As you can see, the conditional operators can be chained (and even nested) to accommodate complex templating requirements.
As you may have noticed, we’re also using the javascript’s ternary operator to implement an if-else structure in our template to show singular or plural form of text depending on the amount of overdue books. We’ve covered the use of implementing conditions with javascript’s ternary operator in our previous blog post about the basics of templating with docx-templates.
Calculating the Discount Amount Using JavaScript Snippet
If a discount is available, we need to calculate the discount amount to display in the generated docx document. We can accomplish this by using a JavaScript snippet inside our dynamic value tags. Any JavaScript code can be executed, including multi-line and multi-command snippets. The last evaluated expression will be inserted into the generated document. Here’s an example from the docx-templates GitHub page:
					{{INS
const a = Math.random();
const b = Math.round((a - 0.5) * 20);
`A number between -10 and 10: ${b}.`
}}
The above snippet will add the last line (the generated string) to the generated document.
In our example, we’re using the following snippet to calculate the discounted price in real-time when the notice letter is generated, by using the “totalCharges” and “discountPercent” key values from our dataset :
{{(totalCharges * (100-discountPercent)/100).toFixed(2)}}
This useful capability allows us to make calculations and changes on the fly during the document generation process without calculating the result before creating the dataset. This enhances our ability to use the same JavaScript code to handle multiple document templates with different calculations.
Saving the generated document
Finally, after generating our .docx notice letter document we are ready to save our document to the local computer. We’ll use the account ID to set the file name and call our “saveCreatedDocument” function to execute the process of downloading the files by providing the output file object, file name, and MIME type:
					//set the output filename to the account id or default if missing
  if (
    letterDataObj.hasOwnProperty("accountId") &&
    letterDataObj.accountId !== ""
  ) {
    filename = letterDataObj.accountId + "_notice.docx";
  } else {
    console.error(
      "generateNoticeLetter: could not find the account ID for creating a file name. The file will be saved as:",
      filename
    );
  }

  //download the created document
  saveCreatedDocument(report, filename, FILE_MIME_TYPE);
Here is our download function:
					function saveCreatedDocument(data, fileName, mimeType) {
  //create a url for document data
  const blob = new Blob([data], { type: mimeType });
  const url = window.URL.createObjectURL(blob);

  //trigger file download
  const a = document.createElement("a");
  a.href = url;
  a.download = fileName;
  document.body.appendChild(a);
  a.style = "display: none";
  a.click();
  a.remove();

  //revoke the document url after 1 second
  setTimeout(() => {
    window.URL.revokeObjectURL(url);
  }, 1000);
}
Conclusion
In conclusion, using the docx-templates package for JavaScript document generation opens up numerous possibilities. With advanced techniques like conditional text, looping through data for tables, and embedding JavaScript snippets, you can create dynamic and tailored documents effortlessly. Using docx-templates to dynamically create template data and inject literal XML further improves accuracy and performance. Finally, using dynamic images and hyperlinks gives your generated documents can give your generated documents an impressive professional final touch.
Our advanced example of generating a library late notice showcases the power and flexibility of this approach. Don’t hesitate to explore more options and adapt this scenario to your own requirements. Opening the docx document as a zip file reveals its raw content, providing deeper insights into its structure and enabling further customization. We encourage you to dive into the features of docx-templates, experiment with different features, and make the most out of this powerful tool.
Embrace the seamless integration with Google Docs and MS Office, leveraging the browser environment to execute your JavaScript code. This method not only modernizes document creation but also simplifies it by eliminating the need for complex setups and expensive infrastructure.
Thank you for reading, and we hope you found this guide useful.
Frequently Asked Questions
Why Generate Word Documents in JavaScript?
JavaScript is a powerful language for automatically generating documents. Executing JavaScript code directly in the browser has significant advantages:
- It is one of the most common programming languages, with vast access to tutorials, code examples, and javascript snippets
- It allows seamless integration with web applications.
- It eliminates the need for server-side processing.
- It avoids client installation, leveraging the widespread and familiar browser usage instead.
- It leverages the power of modern browsers, which can easily handle complex operations.
- Running code in a browser environment also offers real-time updates and previews. Users and developers can see changes instantly, enhancing their overall experience.
However, there are some disadvantages. Older versions of browsers may not support all JavaScript features, causing compatibility issues. Also, working with raw code can be challenging for those unfamiliar with programming.
Despite these challenges, the benefits of using JavaScript for document generation are clear. It streamlines workflows and provides a flexible solution for creating dynamic documents. JavaScript offers a robust and versatile option for developers and businesses looking to automate document creation.
The docx-templates library in JavaScript is handy for creating documents compatible with Google Docs and MS Office. Using JavaScript, developers can quickly and efficiently generate a Word document from templates.
What is a .docx document?
A .docx document is a widely used file format for word processing. Introduced by Microsoft Office Word, it has become a standard for creating, editing, and sharing text documents. Unlike the older .doc format, a .docx file is essentially a zip file containing multiple XML files. These XML files store the document’s text, styles, images, and other elements using a specific syntax.
One advantage of the .docx format is its compatibility with various word processors, including Google Docs and LibreOffice. This ensures that documents look consistent and professional, regardless of the software used. The zip file structure also makes .docx files more efficient and less prone to corruption compared to the older .doc format.
Understanding that a .docx file is a zip file with XML content can help you appreciate its flexibility and robustness. You can even unzip a .docx file to explore its components and see how the document is structured. This insight is valuable for anyone looking to automate document creation or customize document templates. In summary, the .docx format is a powerful and versatile tool in modern word processing.
Are there alternative docx template javascript packages besides docx-templates?
Sure. In terms of javascript packages that can run on the browser a couple of popular alternatives are:
- using docxtemplater to generate documents from a template. Note that docxtemplater also has a paid version with additional functionality.
- using docx to create or modify .docx files.
Both are very popular packages that are widely used. If you’re looking to develop a production app or service we advise you to take the time to understand the pros and cons of each package before committing to one.

Skip the hard work
Developing the perfect document automation solution takes time and effort.
We’ll develop the perfect document automation system that fits perfectly with your needs!
Related Posts


